【笔记】设计模式及js实现(一)创建型模式
Mar 30, 2019前端js设计模式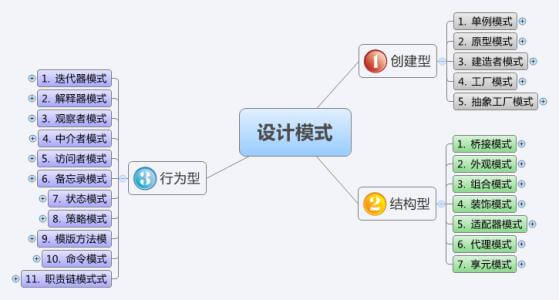
设计模式及js实现
23种设计模式根据其目的(模式是用来做什么的)可分为创建型(Creational),结构型(Structural)和行为型(Behavioral)三种:
- 创建型模式主要用于创建对象。
- 结构型模式主要用于处理类或对象的组合。
- 行为型模式主要用于描述对类或对象怎样交互和怎样分配职责。
目录
创建型模式
- 工厂方法模式(Factory Method)
- 抽象工厂模式(Abstract Factory)
- 建造者模式(Builder)
- 原型模式(Prototype)
- 单例模式(Singleton)
创建型模式
工厂方法模式(Factory Method)
最常用的设计模式之一,这种类型的设计模式属于创建型模式,它提供了一种创建对象的最佳方式。
在工厂模式中,我们在创建对象时不会对客户端暴露创建逻辑,并且是通过使用一个共同的接口来指向新创建的对象。
工厂方法模式的实质是“定义一个创建对象的接口,但让实现这个接口的类来决定实例化哪个类。工厂方法让类的实例化推迟到子类中进行。”
简单来说:就是把new对象的操作包裹一层,对外提供一个可以根据不同参数创建不同对象的函数。
优缺点
- 优点:1、一个调用者想创建一个对象,只要知道其名称就可以了。 2、扩展性高,如果想增加一个产品,只要扩展一个工厂类就可以。 3、屏蔽产品的具体实现,调用者只关心产品的接口。4、可以隐藏原始类,方便之后的代码迁移。调用者只需要记住类的代名词即可。
- 缺点:每次增加一个产品时,都需要增加一个具体类和对象实现工厂,使得系统中类的个数成倍增加,在一定程度上增加了系统的复杂度,同时也增加了系统具体类的依赖。
js实现
1 | /** |
抽象工厂模式(Abstract Factory)
抽象工厂模式就是:围绕一个超级工厂类,创建其他工厂类;再围绕工厂类,创建实体类。
相较于传统的工厂模式,它多出了一个超级工厂类。
优缺点
与工厂模式类似
- 优点:当一个产品族中的多个对象被设计成一起工作时,它能保证客户端始终只使用同一个产品族中的对象。
- 缺点:产品族扩展非常困难,要增加一个系列的某一产品,既要在抽象的 Creator 里加代码,又要在具体的里面加代码。
js实现
准备实体类
1 | /** |
准备工厂类
假设 Cat 和 Dog属于 Animal 工厂的产品;Male 和 Female 属于 Person 工厂的产品。所以需要实现 2 个工厂类:Animal 和 Person。
由于工厂类上面还有个超级工厂,为了方便工厂类生产实体,工厂类应该提供生产实体的方法接口。
为了更好的约束工厂类的实现,先实现一个接口类:1
2
3
4
5
6
7
8
9class AbstractFactory {
getPerson() {
throw new Error("子类请实现接口");
}
getAnimal() {
throw new Error("子类请实现接口");
}
}
接下来,Animal 和 Dog 继承这个接口类,实现对应方法即可:1
2
3
4
5
6
7
8
9
10
11
12
13
14
15
16
17
18
19
20
21
22
23
24
25
26
27
28
29
30
31
32
33
34
35
36
37
38
39
40
41/**
* Person工厂
*/
class PersonFactory extends AbstractFactory {
getPerson(person) {
person = person.toLocaleLowerCase();
switch (person) {
case "male":
return new Male();
case "female":
return new Female();
default:
break;
}
}
getAnimal() {
return null;
}
}
/**
* Animation工厂
*/
class AnimalFactory extends AbstractFactory {
getPerson() {
return null;
}
getAnimal(animal) {
animal = animal.toLocaleLowerCase();
switch (animal) {
case "cat":
return new Cat();
case "dog":
return new Dog();
default:
break;
}
}
}
实现“超级工厂”
1 | class Factory { |
使用超级工厂1
2
3
4
5
6
7
8
9
10
11
12
13
14
15
16
17
18
19/**
* 调用
*/
// 创建person工厂
const personFactory = new Factory("person");
// 从person工厂中创建 male 和 female 实体
const male = personFactory.getPerson("male"),
female = personFactory.getPerson("female");
male.say();
female.say();
// 创建animal工厂
const animalFactory = new Factory("animal");
// 从animal工厂中创建 dog 和 cat 实体
const dog = animalFactory.getAnimal("dog"),
cat = animalFactory.getAnimal("cat");
dog.say();
cat.say();
建造者模式(Builder)
建造者模式可以将一个复杂的对象的构建与其表示相分离,使得同样的构建过程可以创建不同的表示。也就是说如果我们用了建造者模式,那么用户就需要指定需要建造的类型就可以得到它们,而具体建造的过程和细节就不需要知道了。建造者模式实际就是一个指挥者,一个建造者,一个使用指挥者调用具体建造者工作得出结果的客户。
建造者模式主要用于“分步骤构建一个复杂的对象”,在这其中“分步骤”是一个稳定的算法,而复杂对象的各个部分则经常变化。
同样作为创建型的设计模式,需要注意和工厂模式的区别,工厂虽然也是创建对象,但怎样创建无所谓,工厂模式关注的是创建的结果;而建造者模式不仅得到了结果,同时也参与了创建的具体过程,适合用来创建一个复杂的复合对象。
优缺点
- 优点: 1、建造者独立,易扩展。 2、便于控制细节风险。
- 缺点: 1、产品必须有共同点,范围有限制。 2、如内部变化复杂,会有很多的建造类。
建造者模式的使用有且只适合创建极为复杂的对象。在前端的实际业务中,在没有这类极为复杂的对象的创建时,还是应该直接使用对象字面或工厂模式等方式创建对象。
js实现
假设一个出版社的书籍后台录入系统的业务场景,书籍有四个必填信息,分别是:书名,作者,价格,分类;我们希望创建一个书籍对象返回给后端。1
2
3
4
5
6
7
8
9
10
11
12
13
14
15
16
17
18
19
20
21
22
23
24
25
26
27
28
29
30
31
32
33
34
35
36
37
38
39
40
41
42
43
44
45
46
47
48/**
* 书籍建造者类
*/
class BookBuilder {
constructor() {
this.name = '';
this.author = '';
this.price = 0;
this.category = '';
}
withName(name) {
this.name = name;
return this;
}
withAuthor(author) {
this.author = author;
return this;
}
withPrice(price) {
this.price = price;
return this;
}
withCategory(category) {
this.category = category;
return this;
}
build() {
return {
name: this.name,
author: this.author,
prices: this.price,
category: this.category
}
}
}
//调用建造者类
const book = new BookBuilder()
.withName("JavaScript应用程序设计")
.withAuthor('Eric Elliott')
.withPrice(59)
.withCategory('技术')
.build();
上面就通过我BookBuilder这个创建者类的写法和调用方法,但是仅仅是一个4个属性的对象,我们使用了如此多的代码去创建,这远比直接在constructor传递参数创建对象要复杂得多。这是由于在创建的过程中,我们有太多的withXX方法。我们其实可以自动创建这类withXX方法以简化代码。1
2
3
4
5
6
7
8
9
10
11
12
13
14
15
16
17
18
19
20
21
22
23
24
25
26
27
28
29
30
31
32
33
34
35
36
37
38/**
* 书籍建造者类
*/
class BookBuilder {
constructor() {
this.name = '';
this.author = '';
this.price = 0;
this.category = '';
Object.keys(this).forEach(key => {
const withName = `with${key.substring(0, 1).toUpperCase()}${key.substring(1)}`;
this[withName] = value => {
this[key] = value;
return this;
}
})
}
//调用建造者
build() {
const keysNoWithers = Object.keys(this).filter(key => typeof this[key] !== 'function');
return keysNoWithers.reduce((returnValue, key) => {
return {
...returnValue,
[key]: this[key]
}
}, {})
}
}
const book = new BookBuilder()
.withName("高效能人士的七个习惯")
.withAuthor('史蒂芬·柯维')
.withPrice(51)
.withCategory('励志')
.build();
1 | /** |
原型模式(Prototype)
用原型实例指向创建对象的类,使用于创建新的对象的类的共享原型的属性与方法。
优缺点
- 优点: 1、性能提高。 2、逃避构造函数的约束。
- 缺点: 1、配备克隆方法需要对类的功能进行通盘考虑,这对于全新的类不是很难,但对于已有的类不一定很容易,特别当一个类引用不支持串行化的间接对象,或者引用含有循环结构的时候。 2、必须实现 Cloneable 接口。
原型模式适合在创建复杂对象时,对于那些需求一直在变化而导致对象结构不停地改变时,将那些比较稳定的属性与方法共用而提取的继承的实现。
js实现
对于原型模式,我们可以利用JavaScript特有的原型继承特性去创建对象的方式,也就是创建的一个对象作为另外一个对象的prototype属性值。原型对象本身就是有效地利用了每个构造器创建的对象,例如,如果一个构造函数的原型包含了一个name属性(见后面的例子),那通过这个构造函数创建的对象都会有这个属性。
真正的原型继承是作为最新版的ECMAScript5标准提出的,使用Object.create方法来创建这样的对象,该方法创建指定的对象,其对象的prototype有指定的对象(也就是该方法传进的第一个参数对象),也可以包含其他可选的指定属性。例如Object.create(prototype, optionalDescriptorObjects),下面的例子里也可以看到这个用法:1
2
3
4
5
6
7
8
9// 因为不是构造函数,所以不用大写
var someCar = {
drive: function () { },
name: '马自达 3'
};
// 使用Object.create创建一个新车x
var anotherCar = Object.create(someCar);
anotherCar.name = '玛莎拉蒂';
Object.create运行你直接从其它对象继承过来,使用该方法的第二个参数,你可以初始化额外的其它属性。例如:1
2
3
4
5
6
7
8
9
10
11
12
13
14
15
16var vehicle = {
getModel: function () {
console.log('车辆的模具是:' + this.model);
}
};
var car = Object.create(vehicle, {
'id': {
value: MY_GLOBAL.nextId(),
enumerable: true // 默认writable:false, configurable:false
},
'model': {
value: '福特',
enumerable: true
}
});
如果你希望自己去实现原型模式,而不直接使用Object.create 。你可以使用像下面这样的代码为上面的例子来实现:1
2
3
4
5
6
7
8
9
10
11
12
13
14
15
16
17
18
19
20
21var vehiclePrototype = {
init: function (carModel) {
this.model = carModel;
},
getModel: function () {
console.log('车辆模具是:' + this.model);
}
};
function vehicle(model) {
function F() { };
F.prototype = vehiclePrototype;
var f = new F();
f.init(model);
return f;
}
var car = vehicle('福特Escort');
car.getModel();
单例模式(Singleton)
单例模式定义:保证一个类仅有一个实例,并提供访问此实例的全局访问点。在于保证一个特定类只有一个实例,第二次使用同一个类创建新对象的时候,应该得到与第一次创建对象完全相同的对象。
单例模式不仅能减少不必要的内存开销, 并且在减少全局的函数和变量冲突也具有重要的意义。当我们需要创建一种或一个类的唯一对象时,就可以使用该模式。
优缺点
- 优点:1、在内存里只有一个实例,减少了内存的开销,尤其是频繁的创建和销毁实例(比如管理学院首页页面缓存)。2、避免对资源的多重占用(比如写文件操作)。
- 缺点:没有接口,不能继承,与单一职责原则冲突,一个类应该只关心内部逻辑,而不关心外面怎么样来实例化。
js实现
最简单的单例模式
1 | let timeTool = { |
静态属性中的实例
1 | function Universe() { |
它的唯一缺点是Universe构造器的属性是公有的,因此它随时可能会被覆盖修改或者丢失。
闭包中的实例
可以把实例封装在闭包中,这样可以保证该实例的私有性并且保证该实例不会在构造函数之外被修改,代价是带来了额外的闭包开销。1
2
3
4
5
6
7
8
9function Universe() {
var instance = this
Universe = function() { // 重写构造函数
return instance
}
}
var uni1 = new Universe()
var uni2 = new Universe()
uni1 === uni2 // true
惰性单例
有时候对于单例对象需要延迟创建(只有在用户需要的时候才会创建对象实例),所以在单例中还存在一种延迟创建的形式,也有人称之为惰性创建。1
2
3
4
5
6
7
8
9
10
11
12
13
14
15
16
17
18const LazySingle = (function() {
let _instance // 单例的实例引用
function Single() { // 单例构造函数
const desc = '单例' // 私有属性和方法
return { // 暴露出来的对象
publicMethod: function() {console.log(desc)},
publickProperty: '1.0'
}
}
return function() {
return _instance || (_instance = Single())
}
})()
console.log(LazySingle()===lazySingle()) // true
console.log(LazySingle().publickProperty) // 1.0
改进
1 | function Universe() { |
ES6中单例
1 | class SingletonApple { |
静态方法优化代码1
2
3
4
5
6
7
8
9
10
11
12
13
14
15
16
17
18
19class SingletonApple {
constructor(name, creator, products) {
this.name = name;
this.creator = creator;
this.products = products;
}
//静态方法
static getInstance(name, creator, products) {
if(!this.instance) {
this.instance = new SingletonApple(name, creator, products);
}
return this.instance;
}
}
let appleCompany = SingletonApple.getInstance('苹果公司', '乔布斯', ['iPhone', 'iMac', 'iPad', 'iPod']);
let copyApple = SingletonApple.getInstance('苹果公司', '阿辉', ['iPhone', 'iMac', 'iPad', 'iPod'])
console.log(appleCompany === copyApple); //true
Author
My name is Micheal Wayne and this is my blog.
I am a front-end software engineer.
Contact: michealwayne@163.com